שלום חברים,
היום ארצה לספר על נושא מעניין שנקרא FBA
– Form Based Authentication בסביבת SharePoint 2013.
באחד הפרויקטים אצל הלקוחות נדרשתי להקים
אתר אינטרנט שפתוח לכלל העולם ובאתר צריך לנהל משתמשים שנרשמים בעזרת טופס (ולא
לנהל אותם ב-AD).
האתר משמש גם עורכי תוכן שאמונים על
עריכת התכנים באתר, לכן נדרשתי לספק להם גישה נפרדת ל-Site נפרד (בפועל אותו DB, השתמשתי ביכולות ה-Extend
של ה-WebApplication )בו הם יכולים לעבוד
ולפרסם את התוכן, עורכי התוכן שייכים לארגון שמנוהל ב-AD.
תצורת החווה : שרת FE, שרת APP, שרת SQL.
במשפט על Form
Based Authentication :
Form Based Authentication זהו ישות לניהול זהויות
המבוססת על ASP.NET membership ו - role
provider. Form
Based Authentication
ב-SharePoint 2013 היא שיטת אימות המבוססת
על claims-based authentication. (ניהול חיצוני של
זהויות)
אז בואו נתחיל מהשלב הראשון
שהוא יצירת DataBase שיאגור וינהל את כל המשתמשים שירשמו לאתר (Creating
the Membership Database) :
1.
נווטו
אל C: \ Windows \ Microsoft.NET \ Framework64 \ v4.0.30319 \
2.
הפעילו
את הקובץ "aspnet_regsql.exe"
3.
מסך
פתיחה יופיע. לחצו על Next.
4.
בחרו
באפשרות "
Configure SQL Server for application services " ולחצו על Next.
5.
הזינו
את השם של שרת ה SQL Server ופרטי האימות, בחרו ב Windows
Authentication . הזינו את שם מסד הנתונים, לדוגמא "ManageFBAUsersDB". בסיום הזנת
הנתונים לחצו על Next.
6.
כעת
מוצג מסך אישור ההגדרות. לחצו על Next.
7.
כעת
יופיע מסך " "database has been created or modified. לחצו על סיום והאשף ייסגר.
8.
עכשיו
שה-DataBase נוצר, נצטרך לתת הרשאות ל- SharePoint לקרוא ולכתוב אליו. התחברו למסד הנתונים, ותיתנו הרשאות
לחשבון השירות שמפעיל את SharePoint, ניתן לראות את החשבון
שמריץ את ה-SharePoint ע"י צפייה בהגדרות המתקדמות של ה-Application
Pool של ה-Central
Administration .
9.
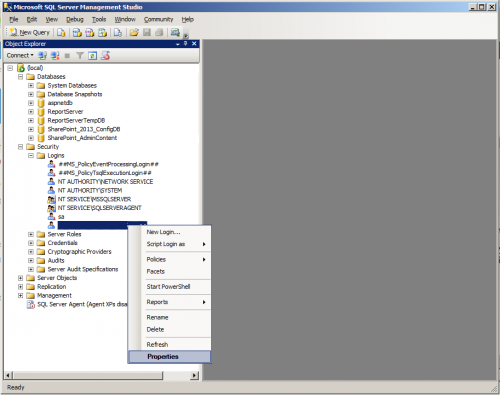
תחת
Security/Logins מצאו את המשתמש
של SharePoint . לחצו על המשתמש ולחצו על 'מאפיינים'.
10.
עברו
לדף "מיפוי משתמש" ובדקו את תיבת הסימון "Map" עבור מסד הנתונים
"ManageFBAUsersDB" . סמנו את תפקיד החברות "db_owner" ולחצו על אישור. למשתמש
זה צריכה להיות עכשיו הרשאה מלאה לקריאה וכתיבה למסד נתוני "ManageFBAUsersDB".
עכשיו אחרי שיצרתם מסד
נתונים , צריך להוסיף משתמשים כדי שאוכל להתחבר לאתר בתצורת FBA. יש מס' דרכים לעשות את זה. אני בחרתי לנהל את המשתמשים מחוץ ל- SharePoint עם IIS . כדי לנהל את המשתמשים ב-IIS , אני אצור אתר דמה רק לניהול משתמשים.
השלב השני
בתהליך הוא להוסיף משתמשים למסד הנתונים שייצרו בשלב הראשון (Adding users
to the Membership Database) :
1.
פתחו את ה-IIS.
2.
לחצו לחיצה ימנית על אתרים
ובחרו באפשרות "הוסף אתר אינטרנט ..."
3.
אחרי שחלון הזנת
נתונים נפתח ,הזינו שם בעל משמעות, הזינו נתיב לתיקייה ריקה ולסיום הזינו מספר Port אקראי שאינו בשימוש ולחצו על אישור.
4.
לחצו על "Application Pools". Application
Pools עם אותו שם צריך להופיע
במאגר יישומים .ה- NET Framework.
של ה-Application
Pools במאגר יישומים צריך להיות
"2.0". אם הוא לא, תצטרכו לשנות את הגדרותיו ולשנות אותו ל- "2.0".
5.
כעת צריך להגדיר את החשבון
שיריץ את ה-ApplicationPool הגדירו אותו כמו החשבון שמריץ את ה-ApplicationPool של SharePoint(CentralAdmin) כדי שיהיה לו הרשאות קריאה וכתיבה למסד הנתונים. בחרו את ה-ApplicationPool ולחצו על "הגדרות מתקדמות ..." בחלונית
ניווט הימנית. בחלון שנפתח, לחצו על Identity כדי לבצע את השינוי. בחרו "חשבון מותאם אישית"
והזינו את שם המשתמש של חשבון שירות SharePoint וסיסמא. לחצו על אישור בכל החלונות הפתוחים כדי לסגור
אותם.
6.
עכשיו ניצור חיבור למסד
הנתונים, ל-DataBase שיצרנו בשלב הראשון. בחרו באתר החדש שיצרתם ופתחו את הדף "Connection
Strings".
7.
לחץ על "הוסף
..." בניווט הימני. הוסיפו את הפרטים הבאים : שם ל-Connection String , שם שרת SQL ושם ה-DB שיצרתם בשלב הראשון. בחרו באפשרות "Use Windows
Integrated Security" ולחצו על אישור.
8.
עכשיו ניצור את ה- Provider, שיאפשר לנו לערוך משתמשים במסד הנתונים. לחצו על "Providers". (אם " Providers " ו- ".NET Users"
חסרים הגדירו את ה-ApplicationPool
ל- 2.0 .NET).
9.
בעמוד Providers, בחרו ".NET
Users " תחת Feature . לחצו על "הוסף ..." בניווט הימני. בחלון שמופיע, בחרו
בסוג "SQLMembershipProvider" והזינו לו שם. בחרו את האפשרויות השונות שאתם רוצים לקשר עם
ה-Provider ראו טבלה מתחת.
|
Option
|
Value
|
|
ApplicationName
|
/
|
|
ConnectionStringName
|
This must match the database connection we
setup earlier
|
|
EnablePasswordReset
|
True
|
|
EnablePasswordRetrieval
|
False
|
|
RequiresQuestionAndAnswer
|
False
|
|
RequiresUniqueEmail
|
True
|
|
StorePasswordInSecureFormat
|
True
|
לחצו
על OK.
10.
עכשיו נוסיף משתמשים למסד
הנתונים. לחצו ".NET Users" מה-Feature. הדבר הראשון שאנחנו צריכים לעשות לפני שנוכל ליצור משתמשים הוא להגדיר
את ה-Provider כברירת מחדל, לחצו על "Set Default Provider ", בחרו את ה-Provider שיצרתם ולחצו על אי
שור. כעת לחצו על "הוסף ..." בניווט הימני
כדי להוסיף משתמשים. הזינו למשתמש את הפרטים הבאים : שם, כתובת הדוא"ל וסיסמא (צריכה להיות באורך
של לפחות 7 תווים וחייב להכיל לפחות תו אחד שאינו אלפאנומרי) לסיום לחצו אישור כדי
ליצור את המשתמש ולסגור את החלון. ניתן ליצור גם
Role Provider במידה ותרצו לעשות שימוש בפונקציה זו באותה דרך שיצרתם משתמשים.
אחרי
שהוספתם משתמשים למסד הנתונים של שיצרתם בשלב הראשון, אתם יכולים להמשיך לשלב השלישי
כדי להגדיר את ה-membership
provider עבור SharePoint.
השלב השלישי
בתהליך הוא לערוך את קבצי ה- web.config (Editing
the Web.Config Files) :
SharePoint מחולק לכמה WebApplications: - Central Administration, Security
Token Service ו-WebApplications לאתרי האינטרנט של SharePoint. כל אחד מיישומי אינטרנט אלו צריך להכיר את ה- membership
provider שיצרתם בשלב הקודם . הוסיפו
את הגדרות ה- membership
provider ישירות ל - machine.config . ע"י הוספה ל- machine.config ,התצורה תעבור בירושה לכל קבצי web.config במחשב – מה שמצריך מכם לבצע את השינויים פעם אחת, ולא
צריך לזכור לבצע את השינויים בכל פעם שיוצרים יישום האינטרנט חדש של SharePoint. ישנו WebApplication
שעוקף את הגדרות ה-machine.config
והוא- SecurityTokenService לכן תצטרכו לערוך את קובץ ה-Web.config שלו בנפרד. פתחו את IIS, תחת אתרים, שירותי האינטרנט של SharePoint, לחצו לחיצה ימנית על SecurityTokenServiceApplication ולחצו על סייר. ערכו web.config בתיקייה שנפתחה (עריכת הקובץ מפורטת בסעיף 5).
נווט
אל "C:
\ Windows \ Microsoft.Net \ Framework64 \ v4.0.30319 \ Config" ופתחו את הקובץ
"machine.config" לעריכה .

ב-Node <ConnectionString>, הוסיפו את השורה הבאה:
<add connectionString="Server=שם שרת SQL;Database=שם ה-DB
שיצרתם בשלב 1;Integrated
Security=true" name="שם
ה-Connections
String שנתתם
בשלב 2" />
ב<providers> <membership> הוסיפו את הדברים הבאים:
<add name="שם ה- MembershipProvider" type="System.Web.Security.SqlMembershipProvider,
System.Web, Version=4.0.0.0, Culture=neutral, PublicKeyToken=b03f5f7f11d50a3"
connectionStringName="שם ה-Connection String
שיצרתם בשלב 2"
enablePasswordRetrieval="false"
enablePasswordReset="true"
requiresQuestionAndAnswer="false"
applicationName="/"
requiresUniqueEmail="true"
passwordFormat="Hashed"
maxInvalidPasswordAttempts="5"
minRequiredPasswordLength="7"
minRequiredNonalphanumericCharacters="1"
passwordAttemptWindow="10"
passwordStrengthRegularExpression="" />
- שמרו
וסגרו את קובץ machine.config.
.5
ערכית
קובץ Web.config :
<system.web>
<membership>
<providers>
<add name="שם ה-MembershipProvider"
type="System.Web.Security.SqlMembershipProvider,
System.Web, Version=4.0.0.0, Culture=neutral, PublicKeyToken=b03f5f7f11d50a3"
connectionStringName="שם ה-ConnectionString"
enablePasswordRetrieval="false"
enablePasswordReset="true"
requiresQuestionAndAnswer="false"
applicationName="/"
requiresUniqueEmail="true"
passwordFormat="Hashed"
maxInvalidPasswordAttempts="5"
minRequiredPasswordLength="7"
minRequiredNonalphanumericCharacters="1"
passwordAttemptWindow="10"
passwordStrengthRegularExpression="" />
</providers>
</membership>
</system.web>
אחרי
שערכתם את ה-machine.config כל מה שנותר הוא להגדיר את התצורה של SharePoint כדי שישתמש בהגדרות FBA. צרו יישום אינטרנט חדש ב SharePoint. ניתן להחיל את אותן הגדרות ליישום אינטרנט קיים באמצעות דיאלוג ספקי
אימות..
השלב האחרון
בתהליך הוא ליצור WebApplication חדש ולהגדיר אותו לעבוד בתצורת FBA, בנוסף יש להגדיר ברמת ה-SiteCollection עבודה בתצורת FBA :
- גלשו
לאתר הניהול המרכזי ולחצו על לינק Application
Management ולאחר מכן Manage Web Applications
- לחצו על "חדש" כדי ליצור Web Application חדש
- הזינו את הפרטים הבאים : שם, Port, Host Header ובחרו בשיטת הזדהות של Form Based Authentication
(אתם יכולים להשאיר/להסיר את שיטת ההזדהות Windows
Authentication לפי
הצורך) , הזינו את שם ה-Provider שהגדרתם בשלב 2 ולחצו על OK.
-
בסיום היצירה יציג החלון הודעה שה-WebApplication נוצר בהצלחה ויפנה
אתכם ליצור SiteCollection, צרו SiteCollection ובסיום היצירה גלשו
לאתר.
הערה חשובה : בסיום היצירה יש להיכנס להגדרות
אתר, הרשאות אתר וללחוץ על פקד "גישה אנונימית" ב-Ribbon, יש להגדיר ולאפשר גישה אנונימית גם ברמת ה-Site.
- הזינו שם משתמש וסיסמא (שם וסיסמא ל-.NET User ) שיצרתם בשלב 2 .

6. ברוכים הבאים לאתר FBA הראשון שלכם !
בהצלחה !
רון נס.
============================================================================================================================================================================================================================================================
Hello Friends,
Today I will talk about an interesting topic called FBA
- Form Based Authentication in SharePoint environment.
One of my customers asked to set up a website open to
the world and on the SharePoint Site he need to manage users who sign up using Forms
(and not manage them in AD).
The site also serves as content editors in charge for
editing content on the website , so I had to provide them with separate access
to the Site integral ( actually it is the same DB , user can the Extend of the
WebApplication ) where they can work and publish the content , content editor
belonged to an organization run with -AD .
Ranch
Style: FE server, APP Server, SQL Server.
Some brief on Form Based Authentication:
Form Based Authentication This entity identity
management based on ASP.NET membership and role provider. Form Based
Authentication in SharePoint 2013 is the verification method based on claims
-based authentication. (External management of identities)
So let's start the first step is creating a
DataBase that stored and manage all users recorded site (Creating the
Membership Database):
1. Navigate to C: \ Windows \ Microsoft.NET \
Framework64 \ v4.0.30319 \
2. Run the file "aspnet_regsql.exe"
3. Screen will appear. Click on Next.
4. Select "Configure SQL Server for application
services " and click next.
5. Enter the name of the SQL Server and authentication information,
select Windows Authentication. Enter the database name, for example "ManageFBAUsersDB."
When you finish entering the data click next.
6. Now the settings confirmation screen is displayed. Click
on Next.
7 . Screen displays " " database has been
created or modified . Click Finish, and the wizard will close .
8 . Now that the DataBase is created, we have to give
permissions to SharePoint to read and write to it. Connect to the database, and
give permissions to the service account that is running the SharePoint , you
can see the account running the SharePoint by viewing the advanced settings of
the Application Pool of the Central Administration.
9 . Under Security / Logins find the user of SharePoint
. Click on a user and select Properties.
10. Go to " User Mapping " and check the box
for " Map " for the database " ManageFBAUsersDB ." Check
the role membership " db_owner " and click OK. This user should be
now full permission to read and write database "ManageFBAUsersDB."
Now after you created a database, you have to add users
so you can connect to the configuration of FBA. There are number of ways to do
it. I chose to manage the users outside SharePoint with IIS. To manage users in
IIS, I will create a dummy site that only manages users.
The second step in the process is to add users to
the database that you create on the first phase (Adding users to the Membership
Database):
1. Open the IIS.
2. Right-click the Sites and select "Add Web Site ..."
3. After the data entry window opens, enter a meaningful
name, enter the path to the folder is empty and finally enter a random number
that is not used Port and click OK.
4. Click on "Application Pools". Application
Pools with the same name should appear in Window. The NET Framework. Of the
application pool Application Pools should be " 2.0 " . If it is not,
you will need to change its settings and change it to "2.0".
5. Now you need to configure the account that will run
the ApplicationPool defined it as the account running the SharePoint
ApplicationPool (CentralAdmin) in order to have read and write permissions to
the database. Select the ApplicationPool and select "Advanced Settings ..."
The left navigation pane. Window that opens, click the Identity to make the change.
Select "Custom Account" and enter your user name of the SharePoint service
account and password. Click OK in all open windows to close them.
6. Now you need to create a database connection, to the DataBase
you created in the first phase. Select the new site you created and open the
page "Connection Strings".
7. Click "Add ..." in the right Navigation.
Add the following information: Name to Connection String, SQL server name where
the DB you created in the first phase. Select "Use Windows Integrated Security"
and click OK.
8. Now you will create the Provider that allows us to
edit users in the database. Click on "Providers". (If the"
Providers "and. "NET Users" missing sets the ApplicationPool to 2.0.
NET).
9. Providers page, select". NET Users" under Feature.
Click the "Add ..." in the right Navigation. Window that appears,
select the type "SQLMembershipProvider" and enter a name. Select the
various options that you want to associate with the Provider see Table below.
|
Option
|
Value
|
|
ApplicationName
|
/
|
|
ConnectionStringName
|
This must match the database connection we
setup earlier
|
|
EnablePasswordReset
|
True
|
|
EnablePasswordRetrieval
|
False
|
|
RequiresQuestionAndAnswer
|
False
|
|
RequiresUniqueEmail
|
True
|
|
StorePasswordInSecureFormat
|
True
|
Click OK.
10. Now you will add users to the database. Click. "NET
Users" in - Feature. The first thing you need to do before you can create
users is to set the default Provider, click the "Set Default Provider",
select the Provider that you created and click OK. Now click on "Add ..."
in the right Navigation to add users. Enter the user information: name, email
address and password (must be at least 7 characters and must contain at least
one character that is not alphanumeric) finally click OK to create the user and
close the window. You can also create Role Provider if you wish to make use of
the function this is the same way you created users.
After you have added users database created in the first
phase, you can proceed to the third stage to set the membership provider for SharePoint.
The third step in the process is to edit the files
in the web.config (Editing the Web.Config Files):
SharePoint is divided into WebApplications: - Central
Administration, Security Token Service and WebApplications SharePoint Web sites.
Each of these web applications need to know the membership provider you created
in the previous step. Add the settings the provider directly membership to machine.config.
By adding to machine.config, the configuration will be inherited to all
web.config files on the computer - which requires you to make changes once, and
not have to remember to make the changes each time you create a new SharePoint Web
Application. One WebApplication override the - machine.config this is the -
SecurityTokenService so you'll have to edit the web.config file it's
separately. Opened the IIS, under sites, SharePoint, Web Services, right-click
on SecurityTokenServiceApplication and click Explore. Edit the web.config (file
editing detailed in Section 5).
1. Navigate to "C: \ Windows \ Microsoft.Net \ Framework64
\ v4.0.30319 \ Config" and open the file "machine.config"
editing.
2. In Node <ConnectionString>, add the following line:
<add ConnectionString="Server='' server SQL; Database=''
"; Integrated Security=true" Name="" />
3. In <providers> <membership> add the following:
< add name = "Name of the MembershipProvider"
Type =
"System.Web.Security.SqlMembershipProvider, System.Web, Version = 4.0.0.0,
Culture = neutral, PublicKeyToken = b03f5f7f11d50a3"
ConnectionStringName = "Name of the Connection
String you created in step 2"
EnablePasswordRetrieval = "false"
EnablePasswordReset = "true"
RequiresQuestionAndAnswer = "false"
ApplicationName = "/"
RequiresUniqueEmail = "true"
PasswordFormat = "Hashed"
MaxInvalidPasswordAttempts = "5"
MinRequiredPasswordLength = "7"
MinRequiredNonalphanumericCharacters = "1"
PasswordAttemptWindow = "10"
PasswordStrengthRegularExpression = ""
/>
4. Save and close the file machine.config.
5. Web.config files entries:
<system.web>
<Membership>
<Providers>
< add name = "Name of the MembershipProvider"
Type =
"System.Web.Security.SqlMembershipProvider, System.Web, Version = 4.0.0.0,
Culture = neutral, PublicKeyToken = b03f5f7f11d50a3"
ConnectionStringName = "Name the ConnectionString"
EnablePasswordRetrieval = "false"
EnablePasswordReset = "true"
RequiresQuestionAndAnswer = "false"
ApplicationName = "/"
RequiresUniqueEmail = "true"
PasswordFormat = "Hashed"
MaxInvalidPasswordAttempts = "5"
MinRequiredPasswordLength = "7"
MinRequiredNonalphanumericCharacters = "1"
PasswordAttemptWindow = "10"
PasswordStrengthRegularExpression = ""
/>
< / Providers >
< / Membership >
< / system.web >
After you have edit the machine.config all that remains
is to configure SharePoint to use the FBA settings. Create a new Web
application in SharePoint.
The last step in the process is to create a new
WebApplication and set it to work FBA configuration, in addition to be set at
the FBA configuration SiteCollection work:
1. Browse the Central Administration site and click on
the link "Application Management" and then "Manage Web
Applications"
2. Click on "New" to create a new Web
Application
3. Enter the following information: Name, Port, and Host
Header and choose the method of identification of the Form Based Authentication
(you can leave / remove Windows Authentication identification method as needed),
enter the name of the Provider you defined in step 2, and click OK.
4. At the end of the piece window displays a message
that the WebApplication created successfully and refer you to create SiteCollection,
please SiteCollection and end of the work spilled over to the site.
Important Note: At the end of the piece has
come into site settings, site permissions and click Control "anonymous access"
in Ribbon, set and enable anonymous access at both the Site.
5. Just enter a username and password (username and password
to. NET User) you created in step 2.
6. Welcome to your first FBA Site!
Good Luck :)
Ron Ness.