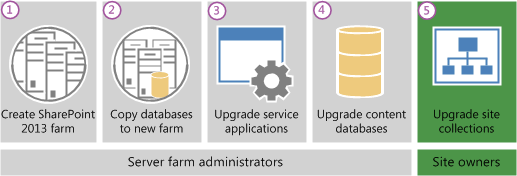
שדרוג חווה מ- SharePoint
2010 ל- SharePoint
2013
1. מתקינים את חוות SharePoint
2013 ומגדירים את תצורת החווה
2. מעבירים את חוות SharePoint
2010 למצב Read-Only כדי שהמשתמשים יוכלו להמשיך לעבוד
בחווה בזמן השדרוג.
השלב השני בתהליך השדרוג הוא להעתיק את מאגרי המידע לסביבה
החדשה. משתמשים בסטודיו של SQL
Server Management למשימות אלה.
1. בזמן שהחווה
ומסדי נתונים במצב קריאה בלבד, מנהל חוות שרתים מגבה את התוכן ומסדי נתונים מהמופע
של SQL Server בחווה SharePoint 2010.
2. מנהל חוות השרתים
משחזר את העותק של מסדי נתונים למופע של SQL Server
בחווה של SharePoint
2013, ומגדיר את מסדי הנתונים לקריאה
לכתוב בחווה החדשה.
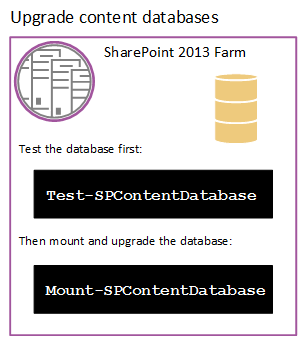
השלב השלישי בתהליך השדרוג הוא לשדרג את מסדי נתונים
ויישומי שירות. (Service Applications) לפני שאתה מצרף ומשדרג את מסדי הנתונים של התוכן, סקור את המידע
הבא :
ודא שהחשבון שאתה משתמש כדי לצרף את מסדי הנתונים הוא חבר
בתפקיד הקבוע db_owner עבור מסדי הנתונים של התוכן שברצונך לשדרג.
ודא שהחשבון שאתה
משתמש כדי ליצור יישומי אינטרנט הוא חבר בקבוצת מנהלי חוות בניהול
מרכזי.
מנהל חוות שרתים מגדיר את יישומי השירות לחווה החדשה. יש
להם את יישומי השירות הבאים מסדי נתונים שיכול לשדרג במהלך תהליך זה:
a. SharePoint
Server 2010 ו-SharePoint Foundation 2010
יישום שירות
קישוריות נתונים עסקי
(BCS )
בלבד
יישום שירות MetaDataMenagement
יישום שירות PerformancePoint Services
יישום שירות
חיפוש (Search)
יישום שירות חנות
מאובטח (Secure Store)
יישום שירות
בפרופיל משתמש (User Profile)
כדי להעביר את
השירות של הפרופילים יש לבצע ייצוא של מפתח ההצפנה של שירות הפרופילים. (לא חובה, ניתן ליצור שירות חדש)
גלוש לנתיב %Program Files%\Microsoft Office
Servers\14.0\Synchronization Service\Bin\ בשרת SharePoint 2010.
miiskmu.exe
באשף של- Microsoft
Identity Integration Server Key Management וודא שייצוא
מפתח מסומן ולחץ המשך.
בשדה משתמש רשום
את מנהל החווה
בסיסמא רשום את
סיסמת המשתמש.
Domain
בסעיף ' Specify
export file name and location' , הקלד את הנתיב אליו יוצא הקובץ.
לחץ על סיום.
כדי לשדרג את מסד
הנתונים של יישומי השירות, יש ליצור יישום שירות חדש ולספק את השם של מסד הנתונים לשימוש
עבור יישום השירות החדש הקיימים.כשיישום שירות נוצר, מתחיל שדרוג מסד הנתונים. לתהליך
זה יש כמה שלבים :
התחלת ה-Instance של ה-Service
Application.
הצעד הראשון הוא להתחיל
את השירותים ,חמשת יישומי השירות שאתה יכול לשדרג: Business Data
Connectivity service, Managed Metadata Web Service, PerformancePoint Services
service, Secure Store service, User Profile service, and Search service. את רוב השירותים ניתן להתחיל מהניהול
המרכזי.
צור את ה-Service
Application
לאחר שהתחלת את שירות
היישום, הצעד הבא הוא ליצור את יישומי השירות ולשדרג את מסדי הנתונים. עליך להשתמש
ב-Windows
PowerShell כדי לשחזר את מסדי הנתונים
של יישום שירות.
צור proxies לשירותי היישום
לאחר ששדרגת את מסדי
הנתונים של יישום שירות, אתה יוצר את הפרוקסי ליישומי השירות ומוסיף אותם לקבוצת פרוקסי
ברירת המחדל. עליך ליצור פרוקסי ליישומי השירות הבאים:
Managed
Metadata service application
Search
service application
Secure
Store service application
PerformancePoint
Services service applicationUser
Profile service applicationאתחול
שירות החיפוש בעזרת PowerShell :
$SearchInst = Get-SPEnterpriseSearchServiceInstance
# Stores the identity for the Search service instance on this server as a variable
Start-SPServiceInstance $SearchInst
# Starts the service instance
לשאר העדכונים ניתן להיעזר
במאמר הבא, לינק
מנהל חוות שרתים
יוצר יישום אינטרנט (Web Application)
בחווה של SharePoint
2013 לכל אחד מיישומי אינטרנט בחווה SharePoint 2010 מוצרים.
השתמש באותה כתובת האתר (לרבות שם, port, וכותרת מארח) וקבע הגדרות של מיפוי
חלופי גישה. (alternate-access
mapping)
אם אתה משתמש
בכתובת שונה, יישומי
Office לא
ינותבו בצורה נכונה לכתובות החדשה וכל הסימניות לכתובות הישנות לא יעבדו.
השתמש באותה שיטת
אימות. (NTLM / Kerberos)
שחזר את הנתיבים כלולים.
שחזר תבניות מכסות.
(quota templates)
קבע את תצורת הגדרות דואר אלקטרוני עבור יישום האינטרנט.
אפשר יצירת אתרים
בשירות עצמי לכל יישום אינטרנט שהשתמש בו בסביבה הקודמת. לשחזר את כל הגדרות יצירת
אתרים בשירות עצמי.
צור נתיב לאתרים שלי (My Site) על יישום האינטרנט שמארח את האתרים
שלי. האתרים שלי זמינים בSharePoint
Server בלבד.
לשחזר את כל
מדיניות יישום אינטרנט או הגדרות יישומי אינטרנט האחרות שהוגדרו בסביבה הקודמת.
מנהל חוות שרתים
מתקין את כל ההתאמות האישיות בצד שרת.
סיבה שכיחה
לכישלונות במהלך השדרוג היא שבסביבה החדשה אין תכונות מותאמות אישית, פתרונות, או
אלמנטים אחרים. ודא שכל הרכיבים המותאמים אישית מסביבת SharePoint 2010 המוצרים מותקנים על שרתי האינטרנט החזיתיים (FE) שלך לפני שאתה משדרג את כל מסדי
הנתונים של תוכן.
רשימה של רכיבים מותאמים אישית :
Custom
site definitions
Custom
style sheets, such as cascading style sheets, and images
Custom
Web Parts
Custom
Web services
Custom
features and solutions
Custom
assemblies
Web.config
changes (such as security)
Ensure that you transfer all
unique settings from the Web.config files for each web application to the new
servers.
<!--[if !supportLists]-->·
<!--[endif]-->Administrator-approved
form templates (.xsn files) and data connection files (.udcx files) for
InfoPath. InfoPath is available in SharePoint Server 2010 only.
<!--[if !supportLists]-->·
<!--[endif]-->Any
other components or files on which your sites depend.
הקפד להתקין את ההתאמות האישיות
למיקום הנכון בחווה החדשה שלך. לדוגמה, צריכים להיות מותקנים גיליונות סגנון
נוספים ל 2010 SharePoint בנתיב / 14, ולא בנתיב החדש / 15, כך שאוספי אתרים שלא שדרגתם
יכולים להשתמש בהם. אם אתה רוצה פתרון שיהיה זמין לשני הנתיבים, יש להתקין אותו
פעמיים, ובפעם השנייה להשתמש בפרמטר CompatibilityLevel בעת התקנתה, והיא תותקן ל/ 15 נתיב
בסוף, כדי לזהות אם כל הרכיבים
הותקנו כנדרש ניתן להשתמש ב-PowerShell ולקבל פידבק חוזר :
Test-SPContentDatabase -Name DatabaseName -WebApplication URL
<!--[if !vml]--><!--[endif]-->
<!--[if !supportLists]-->5.
<!--[endif]-->מנהל חוות שרתים
מצרף את מסדי הנתונים של התוכן לחווה החדשה ומשדרג את מסדי הנתונים של התוכן עבור
יישומי אינטרנט אלה.
<!--[if !vml]--><!--[endif]-->
כדי לבצע חיבור
של בסיס הנתונים לסביבת SharePoint 2013
בצע את הפעולות הבאות :
<!--[if !supportLists]-->a. <!--[endif]-->ודא שיש לך את החברויות הבאות:
<!--[if !supportLists]-->
i.
<!--[endif]-->תפקיד שרת קבוע securityadmin במופע של SQL Server.
<!--[if !supportLists]-->
ii.
<!--[endif]-->תפקיד מאגר קבוע db_owner בכל מסדי
הנתונים, כי הם צריכים להיות מעודכנים.
<!--[if !supportLists]-->b.
<!--[endif]-->ה-User שמריץ את ה-Shell חבר בקבוצת המנהלים בשרת.
<!--[if !supportLists]-->c.
<!--[endif]-->הפעל את SharePoint 2013
Management Shell
<!--[if !supportLists]-->d.
<!--[endif]-->כתוב
את הפקודה הבאה :
Mount-SPContentDatabase -Name DatabaseName -DatabaseServer ServerName -WebApplication URL
<!--[if !supportLists]-->
i.
<!--[endif]-->כשהפרמטר DataBaseName זהו ה-DB אותו תרצה לעדכן.
<!--[if !supportLists]-->
ii.
<!--[endif]-->כשהפרמטר ServerName זהו השרת עליו ה-DB יעודכן.
<!--[if !supportLists]-->
iii.
<!--[endif]-->כשהפרמטר URL זהו ה-WebApplication הרלוונטי ל-DB.
<!--[if !supportLists]-->6.
<!--[endif]-->לאחר חיבור בסיסי
הנתונים יש לוודא כי אכן הכל חובר ועובד כשורה. ישנם מספר דרכים לעשות זאת :
<!--[if !supportLists]-->a.
<!--[endif]-->באתר הניהול
המרכזי של SharePoint
לחץ על " Upgrade and
Migration" ולאחר
מכן על " Check upgrade
status".
<!--[if !supportLists]-->b.
<!--[endif]-->ניתן להסתכל
בלוגים, יש להיכנס ללוגים בתיקיית Logs
תחת /15
ולחפש את הקבצים הבאים :
<!--[if !supportLists]-->
i.
<!--[endif]-->Upgrade-YYYYMMDD-HHMMSS-SSS-error.log
<!--[if !supportLists]-->
ii.
<!--[endif]-->Upgrade-YYYYMMDD-HHMMSS-SSS.log
<!--[if !supportLists]-->
iii.
<!--[endif]-->כש- YYYYMMDD זה התאריך.
<!--[if !supportLists]-->
iv.
<!--[endif]-->ו- HHMMSS-SSS זה הזמן.
- בעזרת PowerShell :
<!--[if !supportLists]--> i. <!--[endif]-->Get-SPContentDatabase | ft Name, NeedsUpgradeIncludeChildren
<!--[if !supportLists]-->7.
<!--[endif]-->מנהל חוות שרתים
מאשר כי השדרוג עבר בהצלחה.
<!--[if !supportLists]-->a.
<!--[endif]-->כדאי מאוד לעבור
על הדברים הבאים ולוודא את תקינותם ע"מ לאשר סופית שניתן לעבוד בחווה :
<!--[if !supportLists]-->
i.
<!--[endif]-->וודא שהאתרים
עובדים במצב של SharePoint 2010
<!--[if !supportLists]-->
ii.
<!--[endif]-->בוצע מיגרציה ל-Userים
שעובדים במצב - claims
authentication
אם קיים.
<!--[if !supportLists]-->
iii.
<!--[endif]-->עדכון
הלינקים בתבניות של טפסי InfoPath
<!--[if !supportLists]-->
iv.
<!--[endif]-->הגדרות החיפוש
והטופולוגיה מוגדרים כנדרש.
<!--[if !supportLists]-->1.
<!--[endif]-->בצע אינדוקס מלא.
<!--[if !supportLists]-->
v.
<!--[endif]-->בצע גיבוי של
החווה
השלב הסופי בתהליך השדרוג הוא לשדרג את אוספי האתרים. ב-SharePoint 2013, בעלי האתרים אחראים על שדרוג האתרים
שלהם.תהליך השדרוג ל- My Site
הוא מעט שונה מסוגים אחרים של אוספי אתרים.
שדרוג My Site
מנהל חוות שרתים אחראי לשדרוג האתר של My Site (My Site
WebApplication/ SiteCollection)
ולאחר מכן משתמשים בודדים יכולים לשדרג את האתרים האישיים או מנהל החווה יכול
לשדרג אותם באמצעות Windows
PowerShell.האיור הבא מציג ארבעה שלבים לתהליך
השדרוג.
<!--[if !vml]--><!--[endif]-->
<!--[if !supportLists]-->1.
<!--[endif]-->My Site Host לא שודרג. לא ניתן לשדרג את האתרים
שלי עדיין.
<!--[if !supportLists]-->2.
<!--[endif]-->מנהל חוות שרתים
שידרגה My Site Host.
אין אתרים אישיים שודרגו.
<!--[if !supportLists]-->3.
<!--[endif]-->חלק מהמשתמשים
שידרגו אתרים אישיים.
<!--[if !supportLists]-->4.
<!--[endif]-->כל האתרים
האישיים שודרגו.
שדרוג אוספי אתרים אחרים מ- 2010 SharePoint
הבעלים של כל אוספי אתרים האחרים יכולים להתחיל לשדרג את
האתרים שלהם ברגע שהם יראו את הודעה בדף הבית של האתר שלהם שהגרסה החדשה
זמינה.האיור הבא מציג ארבעה שלבים לאוסף אתרים במהלך תהליך השדרוג.
<!--[if !vml]--><!--[endif]-->
- בעל האתר מריץ
את ה- health checks כדי לקבוע האם האתר מוכן לשדרוג. באחריותו של בעל האתר לטפל
בבעיות לפני שהוא ממשיך לשלב הבא.
- הפעל את
בדיקות הבריאות לפני השדרוג של אוסף אתרים על ידי שימוש בהגדרות אתר :
<!--[if !supportLists]-->
i.
<!--[endif]-->ודא שחשבון
המשתמש שמבצע הליך זה הוא מנהל אוסף אתרים.
<!--[if !supportLists]-->
ii.
<!--[endif]-->בדף הגדרות האתר
עבור אוסף האתרים, במקטע ניהול אוסף האתרים, לחץ על בדיקות בריאות אוסף אתרים.
<!--[if !supportLists]-->
iii.
<!--[endif]-->בעמוד בריאות
אוסף האתרים להפעיל בדיקות, לחץ על התחל לבדוק.
<!--[if !supportLists]-->1. <!--[endif]-->דו"ח מפרט את כל נושאים וסוגיות שנבדקו, כי אתה צריך
לפתור.
<!--[if !supportLists]-->
iv.
<!--[endif]-->פתור את כל
הבעיות, ולאחר מכן לחץ על נסה את זה שוב כדי לוודא שתקנת אותם.
- (אופציונאלי) לחלופין, כמנהל אוסף אתרים, באפשרותך לבקש
תצוגה מקדימה של אוסף האתר שלך (SiteCollection) דבר זה נקרא : 'הערכת שדרוג
אוסף אתרים'. הערכה השדרוג מאפשרת לבעל אוסף האתרים לראות את התוכן של האתר
בעותק חדש, נפרד מהאתר שבו פועל על SharePoint 2013. פעולות שאתה מבצע בהערכת השדרוג אינן משפיעות על האתר
המקורי. כשמנהל אוסף אתרים מבקש לבצע הערכת שדרוג הבקשה מתווספת ל-Timer
Job שנקרא " Create Upgrade Evaluation Site
Collections" שרץ פעם ביום. מנהל אוסף האתרים יקבל
הודעה במייל כאשר הערכת השדרוג לאוסף האתרים שלו מוכנה. ישנו תוקף לפקיעת
הערכת השדרוג והוא 30 יום, מנהל חוות שרתים יכול לקבוע משך זמן אחר לפקיעת
הערכת השדרוג.
<!--[if !vml]--><!--[endif]-->
כדי לבצע הערכת
שדרוג בצע את הפעולות הבאות :
- ודא שחשבון
המשתמש שמבצע הליך זה הוא מנהל אוסף אתרים.
- בדף הגדרות
האתר עבור אוסף האתרים, במקטע ניהול אוסף האתרים, לחץ על שדרוג של אוסף
אתרים.
- בשלב
" לדף SharePoint
2013" , לחץ על נסה שדרוג
הדגמה.
<!--[if !supportLists]-->
i.
<!--[endif]-->אפשרות זו מתחילה
תהליך של יצירת אוסף אתרי הערכת שדרוג.
- בתיבת
הערכת השדרוג ליצור אוסף אתרים, לחץ על "צור הערכת שדרוג לאוסף
אתרים"
<!--[if !supportLists]-->
i.
<!--[endif]-->תיבה נפתחה
ומודיעה לך כי בקשה התקבלה באתר הדגמה.
- לחץ על
סגור כדי לסגור את התיבה.
מנהל אוסף האתרים מקבל הודעה בדואר אלקטרוני כאשר הערכת
השדרוג זמינה.הודעת הדואר האלקטרוני תכיל קישור לאוסף האתרים. יש לסקור את האתר
ולוודא כי אוסף האתרים שלך ייראה ויתנהג כצפוי בממשק המשתמש החדש.
לאחר שסקרת את הערכת השדרוג ועשית את כל שינויים הדרושים
באתר המקורי שלך מבוסס על ההערכה שלך, אתה יכול לשדרג את אוסף האתרים שלך.
- כאשר בעל
האתר מוכן, הוא מתחיל את תהליך השדרוג. אוסף האתרים מריץ שוב את ה- health
checks באופן אוטומטי. בעל
האתר חייב לטפל בבעיות לפני השדרוג. אם בדיקות ה- health checks מחזירות שאין בעיות, השדרוג מתחיל. (צפה בטבלת החוקים בדף הנספחים – SiteCollection Health Check Rules)
כדי לשדרג בצע את
הפעולות הבאות :
- ודא שחשבון
המשתמש שמבצע הליך זה הוא מנהל אוסף אתרים.
- בדף הגדרות
האתר עבור אוסף האתרים, במקטע ניהול אוסף האתרים, לחץ על שדרוג של אוסף
אתרים.
- בדף השדרוג
של אוסף האתרים, לחץ על שדרוג אוסף אתרים זה.
<!--[if !supportLists]-->
i.
<!--[endif]-->אפשרות זו מתחילה
את תהליך השדרוג של אוסף האתרים שלך.תיבה נפתחה כדי לוודא שאתה רוצה להתחיל את
התהליך.
- לחץ אני
מוכן להתחיל את השדרוג בפועל.
<!--[if !supportLists]-->
i.
<!--[endif]-->השדרוג מתחיל,
ודף מצב השדרוג לאוסף האתרים מוצג. דף זה מציג באופן אוטומטי עדכונים בזמן תהליך השדרוג
ומציג מידע על התהליך, כגון:
<!--[if !supportLists]-->1. <!--[endif]-->שגיאות או אזהרות
<!--[if !supportLists]-->2. <!--[endif]-->מתי התחיל השדרוג
<!--[if !supportLists]-->3. <!--[endif]-->איפה אתה יכול למצוא את קובץ יומן השדרוג
<!--[if !supportLists]-->
ii.
<!--[endif]-->לאחר השדרוג, דף
מצב השדרוג מוצג בממשק המשתמש החדש עם ההודעה, 'השדרוג הושלם בהצלחה'.
<!--[if !supportLists]-->e. <!--[endif]-->לחץ על 'בואו לראות את האתר החדש'
- כשיושלם השדרוג,
הבעלים של האתר רואה את הדף '
Upgrade Status page ' המכיל את המצב וקישור ליומן ה- LOgים.
על בעל האתר מוטלת האחריות לסקור את האתר ולוודא שהכל עובד כראוי. (צפה בטבלת סקירה של עדכון אוסף אתרים בדף הנספחים – Checklist for Reviewing Upgrade Site)
כדי לוודא
שהשדרוג הצליח, יש לבדוק את דף מצב השדרוג לאוסף האתרים. מנהלי אוסף אתרים יכולים
להציג את הדף 'מצב השדרוג בהגדרות אתר כדי לוודא ששדרוג הצליח לאוסף אתרים.
כדי להציג את
המצב בשדרוג הגדרות אתר :
<!--[if !supportLists]-->1. <!--[endif]-->ודא שחשבון המשתמש שמבצע הליך זה הוא מנהל אוסף אתרים.
<!--[if !supportLists]-->2. <!--[endif]-->בדף הגדרות האתר עבור אוסף האתרים, במקטע ניהול אוסף
האתרים, לחץ על שדרוג של אוסף אתרים.
<!--[if !supportLists]-->3. <!--[endif]-->בדף השדרוג של אוסף האתרים ', לחץ על בדוק את מצב השדרוג של
אוסף אתרים.
דף מצב
השדרוג לאוסף האתרים מוצג.
Rule name
|
Description
|
Rule ID
|
Conflicting
Content Types
|
This rule checks for
conflicts between existing content types and content types that are created
when you upgrade the site to SharePoint 2013. A conflict occurs when both
content types have the same name.
|
befe203b-a8c0-48c2-b5f0-27c10f9e1622
|
Customized
Files
|
This rule checks for any
files that were customized (or unghosted) in the site collection or subsites.
When run in repair mode, it can reset the page to the default (reghost the
file).
|
cd839b0d-9707-4950-8fac-f306cb920f6c
|
Missing
Galleries
|
This rule checks for all
default galleries and reports if any are missing from the site collection or
subsites.
|
ee967197-ccbe-4c00-88e4-e6fab81145e1
|
Missing
Parent Content Types
|
This rule checks for missing
parent content types. If a missing parent content type is found, you can
either delete the orphaned content type or associate the orphaned content
type with a different parent content type.ge
|
a9a6769f-7289-4b9f-ae7f-5db4b997d284
|
Missing
Site Templates
|
This rule checks to make
sure that the template the site is based on is available and reports if any
elements are missing.
|
5258ccf5-e7d6-4df7-b8ae-12fcc0513ebd
|
Unsupported
Language Pack References
|
This rule checks to make
sure that the language packs that are used by the site collection exist and
are referenced correctly by the site collection.
|
99c946f7-5751-417c-89d3-b9c8bb2d1f66
|
Unsupported
MUI References
|
This rule checks to make
sure that the multi-user interface elements that are used by the site
collection exist and are referenced correctly by the site collection.
|
6da06aab-c539-4e0d-b111-b1da4408859a
|
Web Parts
What to check
|
What to do if there is a problem
|
Do all the Web Parts from your original site appear in your upgraded
site?
|
If a Web Part zone exists in a customized (unghosted) page, but
not in the site definition, the Web Parts from that Web Part zone may have
been moved into the bottom zone on the page during the upgrade.
Either in Edit Mode for the page in the browser or in SharePoint Designer
2013, look for missing Web Parts in the bottom zone or other zones, or check
whether the Web Parts were closed. For more information about how to work
with Web Parts and Web Part zones in SharePoint Designer 2013, see the
SharePoint Designer Help system.
|
Are there any broken Web Parts pages and are the Web Parts displayed
correctly (in the correct zone, location, and size)?
|
Either in Edit Mode for the page in the browser or in SharePoint Designer
2013, drag the Web Part into the correct zone or modify the Web Part
properties to correct any sizing or positioning problems.
|
Are there any extra or missing Web Parts?
|
Open the page either in Edit Mode for the page in the browser or in
SharePoint Designer 2013. If you see additional Web Parts on your page, look
for closed or inactive Web Parts on the original version of the page. Were
the closed or inactive Web Parts opened by the upgrade process? If so, you
can modify the Web Part properties to close these Web Parts.
If Web Parts are missing, look for errors in SharePoint Designer 2013
such as "Error Rendering Control" or "Missing Assembly."
These errors indicate that the Web Part was not installed or was configured
incorrectly for the new environment and must be reinstalled or reconfigured.
|
Do the Web Parts work correctly?
|
Open the page either in Edit Mode for the page in the browser or in
SharePoint Designer 2013, and look for errors that indicate that a component
or service is missing. Make sure that any components or services that the Web
Parts rely on exist in the upgraded site. Particularly for the database
attach upgrade approach, you must make sure that you have installed all the
components or services that you must have for your Web Parts, and that you
have configured them correctly (for example, you have configured the
Web.config Safe Controls list).
Update and redeploy any Web Parts that exist but no longer function
correctly.
|
Are any Web Parts pages still checked out?
|
If you check out a page to make changes, make sure that you check in the
page again.
|
Are your Excel Web Access Web Parts working correctly? Did you create
your connections again correctly? Are external data sources still working?
|
Verify all connections and external data sources.
|
Tip:
|
If you have problems with a Web Part, append ?contents=1 to
the end of the URL syntax (http:// siteurl/default.aspx?contents=1),
and then press ENTER. This opens the Web Part Maintenance page where you can
remove and repair the broken Web Part.
|
Styles and
appearance
<!--[if !vml]--><!--[endif]--> Tip:
|
Most of the issues in this section can be resolved by correcting the
links to an item.
|
What to check
|
What to do if there is a problem
|
Are all the images on your pages displayed correctly?
|
Verify or fix the links to the images.
|
Are the appropriate cascading style sheet colors and styles used in the
appropriate locations?
|
Verify or fix the links to the cascading style sheet file. Verify the
link on the master page.
|
Theme choices are different in SharePoint 2013 – which theme do you want
to use?
|
Your site's home page, or other pages on your site, may look different
after the site is upgraded. You may have to re-create or revise a theme and
reapply it.
|
Do you have any JavaScript controls that are not working?
|
Verify or fix the links to the controls.
|
Are your pages displayed correctly in the browser?
|
Verify that any HTML on the page is in strict XHTML mode.
|
Are any script errors displayed on any pages?
|
Verify the scripts and links, and verify that any HTML is in strict XHTML
mode.
|
Customized
(unghosted) pages
What to check
|
What to do if there is a problem
|
Are your customizations still in place?
|
Determine whether you have only one issue or a larger problem with the
whole page.
If you added a brand-new page to your original site (for example, if you
replaced Default.aspx with a different file instead of changing the existing
Default.aspx file), the new page has no association with the site definition.
Therefore, it might not resemble the other pages on the upgraded site —
nor can it be reset to resemble them. If you want your customized page to
have the same appearance and behavior as the other pages on your site,
consider creating a brand-new page that is based on the site definition and then
transferring your customizations to that new page.
|
Can you still access the editing controls on the pages?
|
If you customized the editing controls (for example, the Site Actions
link or the Edit Page link in SharePoint 2010 Products), check whether they
still appear. If they don't appear, you can replace them with the editing
controls of the new version by resetting the page to the default version.
Use the Reset to Template command in SharePoint Designer
to reset the page to the default version (also known as reghosting).
After you have restored the default page, you can then reapply your
customizations in the browser by applying a different master page, or by
reapplying the customizations in SharePoint Designer.
|
Are your customizations still appropriate in the new environment, or do
you want to update to the new functionality and look?
|
If you want the new functionality and features, you must reset any
customized pages to use the template. Resetting the page basically discards
the customizations and attaches your page to the appropriate master page. Any
customizations that you want can then be transferred to the master page
instead of being stored in individual pages.
Use the Reset to Template command in SharePoint Designer
to reset the page to the default version (that is, reghost it). After you
have restored the default page, you can then reapply your customizations in
the browser by applying a different master page, or by reapplying the
customizations in SharePoint Designer.
|
Are any pages still checked out?
|
If you check out a page to make changes, make sure that you check in the
page again.
|
בהצלחה !
רון נס.
========================================================================================================================================================================================================================
====================================
Upgrade
farm from SharePoint 2010 to SharePoint 2013
Upgrade
sequence
Details
of steps
Create a SharePoint farm 2013
- Install
the SharePoint farm in 2013 and configure their farm
- Transfer
the Status of the SharePoint 2010 farm to Read - Only mode so that users
can continue to work on the farm during the upgrade.
Copy database from SharePoint
2010 to SharePoint 2013
The
second phase of the upgrade process is to copy the databases to the new
environment . use SQL Server Management Studio for these tasks .
- While farm
and databases in read-only, a farm administrator backs up the content
databases on a SQL Server farm SharePoint 2010.
- Farm
administrator restoring the database copy of the instance of SQL Server in
a SharePoint 2013 farm and set the database read-write new farm .
Upgrade the databases of
SharePoint 2010 products and service applications
The
third phase of the upgrade process is to upgrade the databases and service applications.
Before you attach and upgrade the content databases, review the following
information:
a)
Make sure that the account you use to attach the databases is a member of the
db_owner fixed role for the content databases that you want to upgrade.
b)
Make sure that the account you use to create web applications is a member of
the Farm Administrators group management Centers.
- Farm
administrator sets the new farm service applications. They have the
following service application databases can be upgraded during this process:
<!--[if !supportLists]-->·
<!--[endif]-->SharePoint Server 2010 and SharePoint
Foundation 2010
<!--[if !supportLists]-->o
<!--[endif]-->Application Business Data
Connectivity Service (BCS(
<!--[if !supportLists]-->·
<!--[endif]-->SharePoint Server 2010 only
<!--[if !supportLists]-->o
<!--[endif]-->Application Service
MetaDataMenagement
<!--[if !supportLists]-->o
<!--[endif]-->PerformancePoint Services service
application
<!--[if !supportLists]-->o
<!--[endif]-->Search service application
<!--[if !supportLists]-->o
<!--[endif]-->Secure Store Service application
<!--[if !supportLists]-->o
<!--[endif]-->User Profile Service Application
- To move the
service of the profiles have to export the encryption key of the service
profiles. (Optional, you can create a new service(
- Browse to
the path % Program Files % \ Microsoft Office Servers \ 14.0 \
Synchronization Service \ Bin \ server SharePoint 2010.
- miiskmu.exe
- Wizard of
- Microsoft Identity Integration Server Key Management and make sure that
exporting highlighted key and click Continue.
- Registered
User in the farm manager
- Password
registered in the user password.
- Domain
- In the "Specify
export file name and location, type the path to the file out.
- Click Finish.
- To upgrade
the Service applications database, create a new service application and
provide the name of the database to use for the new service application available.
While service application is created, start upgrading the database. This
process has several steps:
- Getting the
Instance of the Service Application :
- The first
step is to start the service, the five applications that you can upgrade
the service: Business Data Connectivity service, Managed Metadata Web Service,
PerformancePoint Services service, Secure Store service, User Profile
service, and Search service. Most of the services can be started from
Central Administration.
- Create the
Service Application :
- Once you
start the service application, the next step is to create the service
applications and upgrade the databases. You must use Windows PowerShell
to restore the application database service.
- Create the proxies for services applications :
- After you
have upgraded the service application database, you create the proxy
service applications and add them to the default proxy group. You must
create a proxy service applications following:
- Managed
Metadata service application
- Search service application
- Secure Store service application
- PerformancePoint Services service
application
- User Profile service application
- Create
search service application using PowerShell:
$ SearchInst =
Get-SPEnterpriseSearchServiceInstance
# Stores the identity for the search
service instance on this server as a variable
Start-SPServiceInstance
$ SearchInst
# Starts the service instance
- The rest of
the updates can be used in the following article, Link
- Farm
administrator creates a Web application (Web Application) SharePoint 2013
farm each web application SharePoint 2010 farm products.
- Use the
same URL (including name, port, and host header) and set the settings
alternate access mapping. (Alternate -access mapping)
If you are using a different Office applications not
routed correctly bookmarks to the new address and the old addresses will not work.
- Use the
same authentication method. (NTLM / Kerberos(
- Restore the
paths are included.
- Restore
quota templates. (Quota templates(
- Configure
e-mail settings.
- Enable a
self-service site creation for web application using the previous
environment
- Create a
path to my sites ( My Site ) for the Web application that hosts my sites .
My sites are available in SharePoint Server only.
- Recover all
web application policy settings defined in other web applications the
previous environment .
- Farm
administrator installs all server -side customizations .
Common
cause failures during upgrade is a new environment no custom features ,
solutions, or other elements. Make sure all the custom components from the SharePoint
2010 products are installed on the front-end Web servers ( FE ) before you upgrade
all the content databases
.
List
of custom components:
<!--[if !supportLists]-->·
<!--[endif]-->Custom site definitions
<!--[if !supportLists]-->·
<!--[endif]-->Custom style sheets, such as
cascading style sheets, and images
<!--[if !supportLists]-->·
<!--[endif]-->Custom Web Parts
<!--[if !supportLists]-->·
<!--[endif]-->Custom Web services
<!--[if !supportLists]-->·
<!--[endif]-->Custom features and solutions
<!--[if !supportLists]-->·
<!--[endif]-->Custom assemblies
<!--[if !supportLists]-->·
<!--[endif]-->Web.config changes (such as
security(
<!--[if !supportLists]-->·
<!--[endif]-->Ensure that you transfer all unique
settings from the Web.config files for each web application to the new servers.
<!--[if !supportLists]-->·
<!--[endif]-->Administrator-approved form
templates (. Xsn files) and data connection files (. Udcx files) for InfoPath. InfoPath
is available in SharePoint Server 2010 only.
<!--[if !supportLists]-->·
<!--[endif]-->Any other components or files on
which your sites depend.
Be
sure to install the correct position customizations to your new farm. For
example, install additional style sheet to a SharePoint path 2010 / 14 , and
the new path / 15 , the upgraded site collections cannot use them. If you want
a solution that's available to two lanes, install it twice, the second time the
parameter CompatibilityLevel when you install it, and it will be installed to /
15 path
Finally,
to identify if all components are installed properly you can use PowerShell and
get feedback back:
Test-SPContentDatabase-Name
DatabaseName-WebApplication URL
- Farm
administrator attaches the content databases in the new farm and upgrades
the content databases for Web applications these.
To
make the database connection SharePoint 2013 environment, follow these steps :
<!--[if !supportLists]-->·
<!--[endif]-->Make sure you have the following
companies:
<!--[if !supportLists]-->o
<!--[endif]-->i . Securityadmin fixed server role
instance of SQL Server.
<!--[if !supportLists]-->o
<!--[endif]-->ii . Db_owner fixed database role
in each database that they need to be updated .
<!--[if !supportLists]-->·
<!--[endif]-->The User runs the Shell member of
the Administrators group on the server.
<!--[if !supportLists]-->·
<!--[endif]-->Run the SharePoint 2013 Management
Shell
<!--[if !supportLists]-->·
<!--[endif]-->Write the following command:
Mount-SPContentDatabase-Name
DatabaseName-DatabaseServer ServerName-WebApplication URL
<!--[if !supportLists]-->o
<!--[endif]-->When the parameter DataBaseName
is the DB you'd like to update.
<!--[if !supportLists]-->o
<!--[endif]-->When the parameter ServerName
is the server on the DB is updated.
<!--[if !supportLists]-->o
<!--[endif]-->When the URL parameter to
the WebApplication is relevant to DB.
- After the
database connection has to make sure that indeed everything is connected
and working properly . There are several ways to do this :
<!--[if !supportLists]-->·
<!--[endif]-->On the SharePoint Central
Administration click " Upgrade and Migration " and then on "
Check upgrade status
."
<!--[if !supportLists]-->·
<!--[endif]-->You can look at blogs, blogs have
come into the Logs folder under / 15 and look for the following files:
<!--[if !supportLists]-->o
<!--[endif]-->Upgrade-YYYYMMDD-HHMMSS-SSS-error.log
<!--[if !supportLists]-->o
<!--[endif]-->Upgrade-YYYYMMDD-HHMMSS-SSS.log
<!--[if !supportLists]-->o
<!--[endif]-->When - YYYYMMDD is the date.
<!--[if !supportLists]-->o
<!--[endif]-->And HHMMSS - SSS is the time.
<!--[if !supportLists]-->·
<!--[endif]-->Using PowerShell :
<!--[if !supportLists]-->o <!--[endif]-->Get-SPContentDatabase
| ft Name, NeedsUpgradeIncludeChildren
- Farm
administrator confirms that the upgrade was successful.
<!--[if !supportLists]-->·
<!--[endif]-->You better move on the following
and verify the integrity in order to give a final approval can be working on
the farm :
<!--[if !supportLists]-->o
<!--[endif]-->Make sure that the sites are
working in SharePoint 2010
<!--[if !supportLists]-->o
<!--[endif]-->Migration was to work in the Users
- claims authentication if available.
<!--[if !supportLists]-->o
<!--[endif]-->Update links InfoPath Form
Templates
<!--[if !supportLists]-->o
<!--[endif]-->Search settings and topology are
defined as required.
<!--[if !supportLists]-->·
<!--[endif]--> Make full indexing.
<!--[if !supportLists]-->·
<!--[endif]-->Make a backup of the farm
Upgrading SharePoint 2010 site
collection
The
final phase of the upgrade process is to upgrade the site collections. In
SharePoint 2013, site owners are responsible for upgrading their sites. Upgrade
process to My Site is a little different from other types of site collections.
Upgrading My Site
Farm
administrator is responsible for upgrading the site of the My Site (My Site
WebApplication / SiteCollection) and then individual users can upgrade their
personal sites or farm manager can upgrade them by using Windows PowerShell.
Following figure shows four stages the upgrade.
- My Site
Host not upgraded. You cannot upgrade my sites yet.
- Farm
administrator has upgraded My Site Host. No personal sites have been upgraded.
- Some users
have upgraded personal sites.
- All
personal sites have been upgraded.
Other site collections upgrading
from SharePoint 2010
Owner
of any other site collections can begin to upgrade their sites as soon as they
see the message on the home page of their website the new version available.
Following figure shows four stages to collection sites during the upgrade process.
- The website
owner runs the health checks to determine whether the site is ready for an
upgrade. Responsibility of the site owner to handle problems before
continuing to the next step.
<!--[if !supportLists]-->·
<!--[endif]-->Turn on the health testing before
you upgrade a site collection by using the Site Settings :
<!--[if !supportLists]-->o
<!--[endif]-->Make sure that the user account
that performs this procedure is a site collection administrator.
<!--[if !supportLists]-->o
<!--[endif]-->Site Settings page for the site collection,
Site Collection Administration section, click Site collection health checks.
<!--[if !supportLists]-->o
<!--[endif]-->Health page collection sites run tests,
click Start checking.
<!--[if !supportLists]-->o
<!--[endif]-->Report lists all the topics and
issues studied, because you need to solve.
<!--[if !supportLists]-->o
<!--[endif]-->Solve all the problems, and then
click Try it again to make sure you have installed them.
- (Optional
Step), as a site collection administrator, you can request a preview
of your site collection, this is called ' Upgrade evaluation Site Collection'.
The upgrade kit allows the owner of the site collection to see the content
of the site with a new copy, a separate site that is running the
SharePoint 2013. Assessing the actions that you perform the upgrade does
not affect the original site. When a site collection administrator wants
to upgrade assessment application is added to the Timer Job called
"Create Upgrade Evaluation Site Collections" runs once a day. Site
collection administrator will be notified by email when evaluating site
collection upgrade ready. There is a valid expiration and upgrade
evaluation is 30 days, a farm administrator can set a different time
period expiration upgrade kit.
Upgrade
to estimate follows these steps:
<!--[if !supportLists]-->o
<!--[endif]-->Make sure that the user account
that performs this procedure is a site collection administrator.
<!--[if !supportLists]-->o
<!--[endif]-->Site Settings page for the site collection,
Site Collection Administration section , click Site collection upgrade .
<!--[if !supportLists]-->o
<!--[endif]-->Stage "to SharePoint 2013",
click Try Demo upgrade.
<!--[if !supportLists]-->o
<!--[endif]-->This begins the process of creating
site collection upgrade kit.
<!--[if !supportLists]-->o
<!--[endif]-->In the upgrade kit to create a site
collection , click on the "Create site collection upgrade kit "
<!--[if !supportLists]-->o
<!--[endif]-->Box was opened and alerts you that
an application is received from the demo.
<!--[if !supportLists]-->o
<!--[endif]-->Click Close to close the box.
Site
collection administrator is notified by email when evaluating upgrade
available. E-mail message will contain a link to the site collection. To review
the site and make sure that your site collection will look and behave as
expected the new user interface.
After
reviewing the upgrade kit and did all the necessary changes to your original
site based on your evaluation, you can upgrade your site collection.
- When a site
is ready, it starts the upgrade process. Collection sites running again
the health checks automatically. The website owner must take care of
problems before upgrading. If testing the health checks returns no problems,
the upgrade begins. ( View the table of laws on the appendices -
SiteCollection Health Check Rules(
To upgrade do the following:
<!--[if !supportLists]-->o
<!--[endif]-->Make sure that the user account
that performs this procedure is a site collection administrator.
<!--[if !supportLists]-->o
<!--[endif]-->Site Settings page for the site collection,
Site Collection Administration section, click Site collection upgrade.
<!--[if !supportLists]-->o
<!--[endif]-->Upgrade page of the site collection,
click Site collection upgrade it.
<!--[if !supportLists]-->o
<!--[endif]-->This option starts the upgrade
process of your site collection. Box opened to make sure you want to start the
process.
<!--[if !supportLists]-->o
<!--[endif]-->Click I'm ready to start the actual
upgrade.
<!--[if !supportLists]-->o
<!--[endif]-->The upgrade starts , and page mode
upgrade site collection is displayed. This page displays automatically updates
as the upgrade process and displays information about the process, such as :
<!--[if !supportLists]-->§ <!--[endif]-->Errors or warnings
<!--[if !supportLists]-->§ <!--[endif]-->When did the upgrade
<!--[if !supportLists]-->§ <!--[endif]-->Where can you find the upgrade log file
<!--[if !supportLists]-->o
<!--[endif]-->After the upgrade, the upgrade
status page displays the new user interface with the message, "The upgrade
has been successfully completed".
<!--[if !supportLists]-->o
<!--[endif]-->Click ' Come and see the new site'
- When the upgrade is completed, the owners of the site see the '
Upgrade Status page, containing status and the Logs. The website owner's
responsibility to review the site and make sure everything works properly.
( View table overview of web page collection update Appendix -
Checklist for Reviewing Upgrade Site (
To verify the upgrade was successful, check the upgrade
status page collection sites. Site collection administrators can view the page
in upgrade mode settings to make sure that upgrading a managed collection sites.
To view the upgrade status site settings:
<!--[if !supportLists]-->o
<!--[endif]-->Make sure that the user account
that performs this procedure is a site collection administrator.
<!--[if !supportLists]-->o
<!--[endif]-->Site Settings page for the site collection,
Site Collection Administration section, click Site collection upgrade.
<!--[if !supportLists]-->o
<!--[endif]-->On the Site Collection Upgrade
page, click Check upgrade status of the collection sites.
<!--[if !supportLists]-->o
<!--[endif]-->Upgrade Status page displays the
site collection.
Appendix
Site health check collection
rules
Tip:
|
If you have problems with a Web Part, append ?contents=1 to
the end of the URL syntax (http:// siteurl/default.aspx?contents=1),
and then press ENTER. This opens the Web Part Maintenance page where you can
remove and repair the broken Web Part.
|
What to check
|
What to do if there is a problem
|
Do all the Web Parts from your original site appear in your upgraded
site?
|
If a Web Part zone exists in a customized (unghosted) page, but
not in the site definition, the Web Parts from that Web Part zone may have
been moved into the bottom zone on the page during the upgrade.
Either in Edit Mode for the page in the browser or in SharePoint Designer
2013, look for missing Web Parts in the bottom zone or other zones, or check
whether the Web Parts were closed. For more information about how to work
with Web Parts and Web Part zones in SharePoint Designer 2013, see the
SharePoint Designer Help system.
|
Are there any broken Web Parts pages and are the Web Parts displayed
correctly (in the correct zone, location, and size)?
|
Either in Edit Mode for the page in the browser or in SharePoint Designer
2013, drag the Web Part into the correct zone or modify the Web Part
properties to correct any sizing or positioning problems.
|
Are there any extra or missing Web Parts?
|
Open the page either in Edit Mode for the page in the browser or in
SharePoint Designer 2013. If you see additional Web Parts on your page, look for
closed or inactive Web Parts on the original version of the page. Were the
closed or inactive Web Parts opened by the upgrade process? If so, you can
modify the Web Part properties to close these Web Parts.
If Web Parts are missing, look for errors in SharePoint Designer 2013
such as "Error Rendering Control" or "Missing Assembly."
These errors indicate that the Web Part was not installed or was configured
incorrectly for the new environment and must be reinstalled or reconfigured.
|
Do the Web Parts work correctly?
|
Open the page either in Edit Mode for the page in the browser or in
SharePoint Designer 2013, and look for errors that indicate that a component
or service is missing. Make sure that any components or services that the Web
Parts rely on exist in the upgraded site. Particularly for the database
attach upgrade approach, you must make sure that you have installed all the
components or services that you must have for your Web Parts, and that you
have configured them correctly (for example, you have configured the
Web.config Safe Controls list).
Update and redeploy any Web Parts that exist but no longer function
correctly.
|
Are any Web Parts pages still checked out?
|
If you check out a page to make changes, make sure that you check in the
page again.
|
Are your Excel Web Access Web Parts working correctly? Did you create
your connections again correctly? Are external data sources still working?
|
Verify all connections and external data sources.
|
Checklists for reviewing
upgraded sites
Web Parts
Tip:
|
If you have problems with a Web Part, append ?contents=1 to
the end of the URL syntax (http:// siteurl/default.aspx?contents=1),
and then press ENTER. This opens the Web Part Maintenance page where you can
remove and repair the broken Web Part.
|
What to check
|
What to do if there is a problem
|
Do all the Web Parts from your original site appear in your upgraded
site?
|
If a Web Part zone exists in a customized (unghosted) page, but
not in the site definition, the Web Parts from that Web Part zone may have
been moved into the bottom zone on the page during the upgrade.
Either in Edit Mode for the page in the browser or in SharePoint Designer
2013, look for missing Web Parts in the bottom zone or other zones, or check
whether the Web Parts were closed. For more information about how to work
with Web Parts and Web Part zones in SharePoint Designer 2013, see the
SharePoint Designer Help system.
|
Are there any broken Web Parts pages and are the Web Parts displayed
correctly (in the correct zone, location, and size)?
|
Either in Edit Mode for the page in the browser or in SharePoint Designer
2013, drag the Web Part into the correct zone or modify the Web Part
properties to correct any sizing or positioning problems.
|
Are there any extra or missing Web Parts?
|
Open the page either in Edit Mode for the page in the browser or in
SharePoint Designer 2013. If you see additional Web Parts on your page, look for
closed or inactive Web Parts on the original version of the page. Were the
closed or inactive Web Parts opened by the upgrade process? If so, you can
modify the Web Part properties to close these Web Parts.
If Web Parts are missing, look for errors in SharePoint Designer 2013
such as "Error Rendering Control" or "Missing Assembly."
These errors indicate that the Web Part was not installed or was configured
incorrectly for the new environment and must be reinstalled or reconfigured.
|
Do the Web Parts work correctly?
|
Open the page either in Edit Mode for the page in the browser or in
SharePoint Designer 2013, and look for errors that indicate that a component
or service is missing. Make sure that any components or services that the Web
Parts rely on exist in the upgraded site. Particularly for the database
attach upgrade approach, you must make sure that you have installed all the
components or services that you must have for your Web Parts, and that you
have configured them correctly (for example, you have configured the
Web.config Safe Controls list).
Update and redeploy any Web Parts that exist but no longer function
correctly.
|
Are any Web Parts pages still checked out?
|
If you check out a page to make changes, make sure that you check in the
page again.
|
Are your Excel Web Access Web Parts working correctly? Did you create
your connections again correctly? Are external data sources still working?
|
Verify all connections and external data sources.
|
Styles and appearance
Tip:
|
Most of the issues in this section can be resolved by correcting the
links to an item.
|
What to check
|
What to do if there is a problem
|
Are all the images on your pages displayed correctly?
|
Verify or fix the links to the images.
|
Are the appropriate cascading style sheet colors and styles used in the
appropriate locations?
|
Verify or fix the links to the cascading style sheet file. Verify the
link on the master page.
|
Theme choices are different in SharePoint 2013 – which theme do you want
to use?
|
Your site's home page, or other pages on your site, may look different
after the site is upgraded. You may have to re-create or revise a theme and
reapply it.
|
Do you have any JavaScript controls that are not working?
|
Verify or fix the links to the controls.
|
Are your pages displayed correctly in the browser?
|
Verify that any HTML on the page is in strict XHTML mode.
|
Are any script errors displayed on any pages?
|
Verify the scripts and links, and verify that any HTML is in strict XHTML
mode.
|
Customized (unghosted) pages
What to check
|
What to do if there is a problem
|
Are your customizations still in place?
|
Determine whether you have only one issue or a larger problem with the
whole page.
If you added a brand-new page to your original site (for example, if you
replaced Default.aspx with a different file instead of changing the existing
Default.aspx file), the new page has no association with the site definition.
Therefore, it might not resemble the other pages on the upgraded site —
nor can it be reset to resemble them. If you want your customized page to
have the same appearance and behavior as the other pages on your site,
consider creating a brand-new page that is based on the site definition and then
transferring your customizations to that new page.
|
Can you still access the editing controls on the pages?
|
If you customized the editing controls (for example, the Site Actions
link or the Edit Page link in SharePoint 2010 Products), check whether they
still appear. If they don't appear, you can replace them with the editing
controls of the new version by resetting the page to the default version.
Use the Reset to Template command in SharePoint Designer
to reset the page to the default version (also known as reghosting).
After you have restored the default page, you can then reapply your
customizations in the browser by applying a different master page, or by
reapplying the customizations in SharePoint Designer.
|
Are your customizations still appropriate in the new environment, or do
you want to update to the new functionality and look?
|
If you want the new functionality and features, you must reset any
customized pages to use the template. Resetting the page basically discards
the customizations and attaches your page to the appropriate master page. Any
customizations that you want can then be transferred to the master page
instead of being stored in individual pages.
Use the Reset to Template command in SharePoint Designer
to reset the page to the default version (that is, reghost it). After you
have restored the default page, you can then reapply your customizations in
the browser by applying a different master page, or by reapplying the
customizations in SharePoint Designer.
|
Are any pages still checked out?
|
If you check out a page to make changes, make sure that you check in the
page again.
|
Good Luck :)
Ron Ness.